
Adventures of a First Time Beekeeper: Part 1 – Getting Started
By Liz Dennison

Queen Bee with Blue Mark
When my husband and I moved to Philomont, we knew we wanted to do something useful with our property. We considered raising goats that could be leased to clear brush but the cost and effort of fencing, shelter, food, transportation and veterinary care were more than we wanted to take on. We considered raising chickens but most of our neighbors have chickens. The supply of eggs exceeds the demand and I think our two big dogs might like the chickens a little too much. So we considered raising honey bees.
We knew that pollinators need our support and that pollinators in turn support our local gardens, farms, vineyards, and orchards. We also knew that keeping two hives would allow us to put our 10 acres in land use and save on property taxes. We could sell our honey and look into other products like beeswax candles. But we didn’t know anything about keeping bees. To get started we joined the Loudoun Beekeepers Association. This wonderful organization holds monthly meetings on a wide variety of interesting topics from environmental concerns to how to keep bees in an urban setting. The meetings are also a great way to meet other beekeepers and share information.
The next step was to take the beekeeping class offered by the association each year beginning in late February. The class meets once a week for 8 weeks and covers everything a new beekeeper needs to get started. We learned about bee biology, colony activities, managing the hives throughout the seasons, pathogens, parasites, and pests, hive products and beekeeping equipment. We weren’t experts after the class but we had the basics and access to the club’s resources. Best of all, we were assigned an experienced beekeeper as our mentor.
Along with the class, the club brought local beekeepers together to demonstrate beekeeping equipment. This hands-on opportunity helped us choose the equipment options that were right for us. It was also a chance to talk with beekeepers about their successes, failures, and lessons learned. I left the event with one valuable insight. Regardless of the equipment, placement of the hives, or beekeeping philosophy, sometimes “Bees are gonna do what bees are gonna do”. I’ve heard this phrase over and over from experienced beekeepers. Often a hive will succeed or fail in spite of what we do to support it or any mistakes we make. The bees themselves are best at managing the colony. Sometimes it’s best to leave them alone to do what bees do.
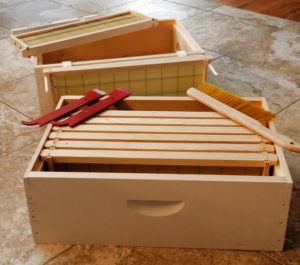
Hive Body with Frames and Tools
There are many options for the hives, accessories and protective clothing. The hive boxes can be homemade, built from kits, purchased complete but unpainted, or purchased complete and ready for setup. For convenience, we ordered the latter. Hive boxes come in various depths (deep, medium or shallow) and widths (8 or 10 frames). All have pros and cons. For us, weight was the deciding factor. A deep frame with honey weighs 10 pounds, so a 10 frame super (box with 10 frames) would weigh 100 pounds! That’s more than I can lift easily when inspecting the hive so we decided on medium boxes with 8 frames. There are just as many options for protective clothing. The helmet, veil and gloves are essential so we bought a set for each of us. We’re comfortable wearing our own light colored, loose fitting clothing around the bees but if you’re very sensitive to bee stings or uneasy around the bees, you can choose from a wide assortment of jackets and coveralls that provide excellent protection.
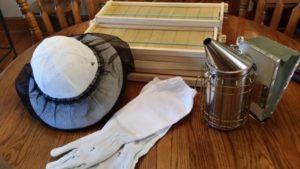
Protective Clothing & Smoker
The training ends at about the time new beekeepers receive their bees so we worked backward from that date to be sure we would have the hives and all accessories in place and ready. We decided we would start with two hives to improve our chance of success and qualify to put our property in land use. We ordered enough hive equipment to build 3 complete hives. The extra equipment could be used if we had the opportunity to capture a wild swarm or to split one of our hives if necessary.
In March, for each of the 3 hives we ordered:
- 3 medium 8 frame boxes (brood chamber and two supers)
- 24 sheets of beeswax foundation (this is where the bees will build their honeycomb)
- 24 frames to hold the foundation
- 48 pins to stabilize the foundation in the frames
- 1 inner cover
- 1 outer cover
- 1 screened bottom board
- 1 entrance reducer
- 1 front feeder bottle
- Apivar (treatment for Varroa Mites)
- Shim wood to level the hive
- 5 cinder blocks (4 to raise the hive off the ground and one on top to keep predators out)
We also ordered some accessories and protective clothing:
- 1 bee brush
- 2 hive tools (to separate boxes and frames when bees “glue” them together)
- 1 smoker and smoker fuel
- 1 frame hanger (to hold frames temporarily removed from the hive during inspections)
- 2 helmets
- 2 veils
- 2 pairs of beekeeping gloves
- 1 extra helmet and veil for guests who want to see the hives
Our total equipment cost for this first year was about $800. Costs can be reduced by building or painting the hives yourself. But this doesn’t include any equipment for harvesting, storing or selling honey because the goal of the first year of any bee colony is simply to grow bees.

Hives in Fenced Area
Once everything was ordered, we had to pick a location for the hives. The site should be fairly level and sheltered from strong winds (i.e. not on a hilltop). There should be a water source nearby (we have a small creek) and some shade during the hottest part of the summer days is helpful. We visited our mentor’s hives to see an example of a good site and he helped us select a place along our driveway that was good for the bees and convenient for keeping an eye on the hives. We installed the hives and found that the ground wasn’t quite as level as it appeared but some shimming fixed that. We installed a coated wire mesh fence to form a 12 by 12-foot area around the hives to keep pests (both four legged and two legged) away from the hives. We were ready for our bees.
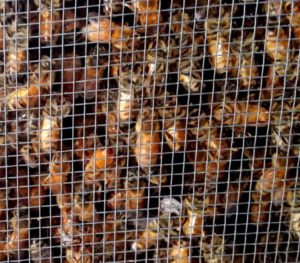
Honeybees in a “Package”
Beekeepers get bees in three ways, packages, nucs, and capture of wild swarms. Since capture of wild swarms is unpredictable, new beekeepers order packages or nucs. A package is simply a screened box containing 5 pounds of bees and a newly mated queen in her own cage that are released into a new hive. It also contains sugar water to feed the bees on their journey. A nucleus, usually called a nuc, is a small established colony of bees, already on frames that are inserted into the center of the brood box for the new hive. To learn as much as we could, we ordered one of each through the club.
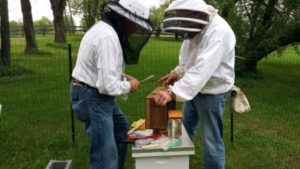
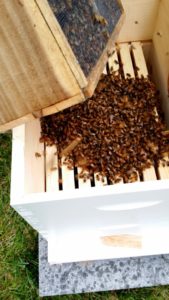
Opening Package of Bees
The package arrived first and our mentor helped us move the bees into our hive. It was actually very easy. The bees moved right in and made themselves at home. When the nuc arrived several weeks later, we put the frames into the hive and those bees settled in as well. To give them a good start, we used a Boardman feeder to provide sugar water to both hives and treated them with Apivar to avoid an infestation of Varroa Mites, a common cause of hive failure. With the bees safely in their hives, we were officially beekeepers.
Releasing Bees into Hive
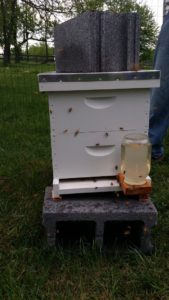
Bees in Hive with Feeder
Check back soon for Part 2 – Raising Bees